| Access
Tips & Tricks How to add calculated fields to queries
For example: Items_Total: [Quantity]*[Unit_Cost] In a calcuated field you enter the name you wish to
give the field first followed by a colon ':'. Then enter the expression
for the calculation, in this case the quantity field multiplied by the
unit cost field. You can perform all sorts of calculations in a query
using calculated fields. You can even add criteria to calculated fields. For example, in the above scenerio you could limit the query output to records whose Items_Total was greater than 500 by adding '>500' to the criteria grid under the [Items Total] field. How can I prevent Users from adding records to my
forms? How to print multiple columns in a report Consecutive numbering for each record in a Report Can I convert my Form into a Report? How to load your Report into MS Word Using Shortcut Keys Do you
find that using the keyboard is sometimes quicker than using your mouse?
Shortcut keys can help you bypass menus and carry out commands directly.
You can use shortcut keys in many ways with Access, from accessing
commands and toolbar buttons to inserting today's date. Shortcut keys are
sometimes listed next to the command name on Access menus. For example, on
the File menu, the Print command lists the shortcut CTRL+P. For a
comprehensive list of shortcuts, ask the Office Assistant for help. In
Access 2000 or any of the other Office 2000 applications, press F1 to
display the Assistant, and then type shortcut keys in the text box.
Here are some of the most useful Access shortcut keys:
Joining Two Strings of Text Together
You can join two strings of text together by using the &
operator in an expression. This is called concatenation. For example, the
result of both of the following expressions is the text string Hello
world! "Hello " & "world!"
"Hello" & " " & "world!" You can use concatenation to combine the text in two or more fields
into a single text string, and you can display the result in a field in a
query, or in a control on a form or report. For example, if you have a table that contains the fields FirstName
and LastName, you can use the following expression to create a text
string that displays the values of the FirstName and LastName
fields separated by a space.
[FirstName] & " " & [LastName] To see how you can use this expression in a form, open the
Northwind sample database, and then open the Employees form in Design
view. The &
operator appears in the text box form header.
In a calculated control on a form or report, precede the expression
with the = operator. Switch to Form view, scroll records, see the results. Another example - open the Customer Labels report in Design view.
The following expression in the Address2Line box uses &
operator to combine values - City, Region, and PostalCode -
into a single string text. =Trim([City]
& " " & [Region] & " " & [PostalCode])
In this expression, the Trim function removes any leading or
trailing spaces. For a more information about concatenation, type combine
text values from multiple fields in the Office Assistant or on the Answer
Wizard tab in the Help window, and then click Search. Using String
Manipulation Functions
You can use functions in your expressions to count characters,
return characters, and determine the location of one string within
another. By using the functions together, you can manipulate text strings
in countless ways. As an example of the flexibility you gain by using
functions in expressions, this article shows you how to separate a text
string into two strings. The string manipulation functions that you can use in Access
include Len, Left, Right, and InStr. The Len Function
Len(string)
returns the number of characters in the string. You can specify the string
itself in quotation marks, or you can specify the field that contains the
text string.
The Left Function
Left(string,
length) returns a specified number of characters from the left side of
a string. The first argument, string, specifies the text string, or
the field containing the string, that you want to extract the result from.
The second argument, length, specifies the number of characters
that you want to return.
The Right
Function Right(string, length)
returns a specified number of characters from the right side of a string. String
specifies the text string, or the field containing the string, that you
want to extract the result from; length specifies the number of
characters that you want to return.
The InStr Function
InStr([start,
]string1, string2[, compare]) returns a number
specifying the position of the first occurrence of one string within
another.
Separating a String
of Text into Two Strings: Step One
You can use string manipulation functions in expressions to
separate a text string that contains a space into two strings. For
example, in a table, you might have a FullName field that contains the
first name and the last name separated by a space. You can open the table
in Design view and add the fields FirstName and LastName. Then you can use
an update query to parse the data in the FullName field and populate the
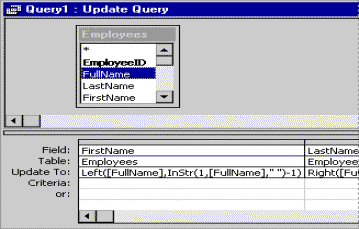
new fields with the correct data. The first step is to extract the first name - the text to the left
of the space. If you know the position of the space character, you can use
that number with the Left function to extract the first name. In a
record where the field FullName contains the text string Robert King,
InStr(1, [FullName], " ") returns 7, the position of the space
character. However, the expression Left("Robert King", 7)
returns the first name, Robert, as well the space character, which you
don't need. The number of characters you actually need is one less than
the number returned by InStr(1, [FullName], " "). Therefore, the
expression that returns the first name is: Left([FullName], InStr(1, [FullName]," ") - 1)
(You can use this expression in an update query.)
Separating a String
of Text into Two Strings: Step Two
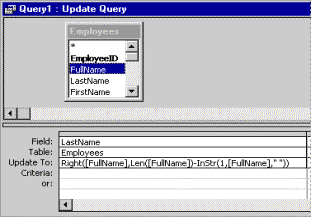
The next step is to extract the last name - the text to the right
of the space character. The total number of characters in FullName is the
number of characters to the left of the space plus 1 (for the space
itself) plus the number of characters to the right of the space. If the
expression InStr(1, [FullName], " ") returns the number of
characters to the left of and including the space, then the number of
characters to the right of the space is Len([FullName]) - InStr(1, [FullName],
" "). Therefore, the expression that returns the last name is: Right([FullName], Len([FullName]) - InStr(1, [FullName], "
")) (You can use this expression in an update query.)
For more information about update queries, type change records as a group by using an update query in the Office Assistant or on the Answer Wizard tab in the Help window, and then click Search.
Sample expressions that you can use to extract a portion of a text
string: These expressions are
commonly used in the Update To line of an update query to place a
portion of a larger field into a new field. You can adapt these
expressions so that you can use them with other common formats. For
example, you can use the expression that is used to extract
"Doe" from "Doe, John" to extract "Seattle"
from "Seattle, WA." MORE INFORMATION
The following expressions are sample expressions that you can use
to extract a portion of a text string. First Name
Original Entry in [Names]: "John
Doe" First Name
Orignial Entry in [Names]: "Doe,
John" First Name
Original Entry in [Names]: "John P.
Doe" Last Name
Original Entry in [Names]: = "John
Doe" Last Name
Original Entry in [Names]: "Doe,
John" Last Name
Original Entry in [Names]: "John P.
Doe" Last Name
Original Entry in [Names]: "John
Doe" or "John P. Doe" Middle Initial
Original Entry in [Names]: "John P.
Doe" Middle Initial
Original Entry in [Names]: "Doe,
John P." Zip Code
Original Entry in [ZipCode]:
"98052-6399" Area Code
Original Entry in [Phone]: (425) 635-7050 Phone Number
Original Entry in [Phone]: (425) 635-7050 Referential Integrity What is referential integrity?
Referential integrity is a system of rules that Microsoft Access uses to ensure that relationships between records in related tables are valid, and that you don't accidentally delete or change related data. You can set referential integrity when all of the following conditions are met:
When referential integrity is enforced, you must observe the following rules:
If you want Microsoft Access to enforce these rules for a relationship, select the Enforce Referential Integrity check box when you create the relationship. If referential integrity is enforced and you break one of the rules with related tables, Microsoft Access displays a message and doesn't allow the change. You can override the restrictions against deleting or changing related records and still preserve referential integrity by setting the Cascade Update Related Fields and Cascade Delete Related Records check boxes. When the Cascade Update Related Fields check box is set, changing a primary key value in the primary table automatically updates the matching value in all related records. When the Cascade Delete Related Records check box is set, deleting a record in the primary table deletes any related records in the related table. |